Learning React.js by example

I’ve been trying to learn React.js in my spare time over the past month. We have a large project using the technology and I thought it would be a good idea for me to at least know the basics. When I asked how I should begin, my team suggested I start with the tutorial here. This was a great introduction and helped me get an idea of how to create a basic React.js application. We all learn in different ways, and one of the ways I like to learn is through baby steps, learning each new thing in small increments. To do this, I thought I would try to build an application using the technology for a business problem we were facing.
We use Unfuddle for project management and source control on many of our projects. Unfuddle is a great tool and does many great things for a low cost point. When it comes to reporting on source and ticket management, it does a pretty good job. The problem is when it comes to reporting on “activity”; it is pretty limited when using the user interface. Fortunately for us, Unfuddle provides an API we can use to get activity data by date for a project, then we can add filtering of our own to find the data we are looking for. The use case for this came when coming to the end of a very busy “sprint” for a developer where he had fixed a dozen tickets and built several new features. We couldn’t figure out an easy way to find all tickets that were resolved or closed by a given developer during a sprint time period. The minimal goal of this project is to be able to provide this information.
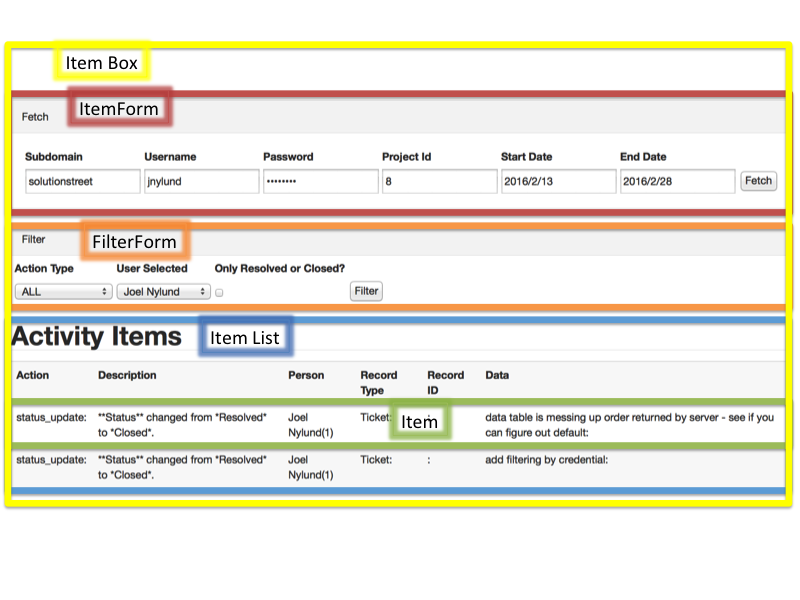
React takes a component based approach to building interfaces, so the first step in building a React.js application is breaking down the application into components. For my application, the first thing I need is to provide the Unfuddle API with the information necessary to fetch the data. This includes subdomain, user, password, project ID and a date range. I will call this component the “ItemForm”. Once I have that, I need a way to filter the activity items by action type, and user, and finally a way to look for the “completed” tickets. I will call this component the “FilterForm”. I also need a table to list all the results from the query and filter requests, this component will be the “ItemList”. Lastly, I need a component to hold all the other components inside of them, I will call this the “ItemBox”. See figure 1 below for a diagram of my components and how they are laid out.
figure 1
Before we start, we need to figure out how we are going to setup our project. If we were experts, we would use something called “NPM” (Node Package Manager), and ES6 (the latest version of JavaScript), but since we are newbies, we will use a basic set of cloud based Javascript files to run React.js. We are also not using “Typescript”, which is a superset of JavaScript and is commonly used with React.js. Lastly, React.js is a “View” framework and is typically paired with a Flux implementation which provides features similar to Model & Controller in a traditional MVC framework. We will learn about all these things in my follow up article.
All of the code mentioned here can be viewed and executed by going to http://jnylund.github.io/ . You can test it out if you have an Unfuddle account, just put in your subdomain, user, password and project ID. If you don’t have an Unfuddle account, you can create one using a free trial. The JavaScript source is here – http://jnylund.github.io/scripts/unfuddleactivity.js.
We are going to start with 3 files:
index.html – this is our main html file to load our dependent js files as well as our application file.
css/base.css – this is our css file to make things look nice, we also use bootstrap.css to make things look nicer.
scripts/unfuddleactivity.js – this is our application code, where all our React components live.
Let’s start with our index.html file. See the comments for each of the included files and why we included them.
1 2 3 4 5 6 7 8 9 10 11 12 13 14 15 16 17 18 19 20 21 22 23 24 25 26 27 | Unfuddle Activity Using React.js
<!DOCTYPE html>
<html>
<head>
<meta charset="utf-8">
<title>Unfuddle Activity Using React.js</title>
<link rel="stylesheet" href="https://cdnjs.cloudflare.com/ajax/libs/twitter-bootstrap/3.3.6/css/bootstrap.css" />
<link rel="stylesheet" href="css/base.css" />
<!-- This package gets you immediate access to React, without also requiring the JSX transformer. This is especially useful for cases where you want to browserify your module using React -->
<script src="https://cdnjs.cloudflare.com/ajax/libs/react/0.14.7/react.js"></script>
<!-- This package serves as the entry point of the DOM-related rendering paths. It is intended to be paired with the isomorphic React, which will be shipped as react to npm -->
<script src="https://cdnjs.cloudflare.com/ajax/libs/react/0.14.7/react-dom.js"></script>
<!-- Babel is a js compiler, this library lets your browser compoile your React.js code into plain old javascript. -->
<script src="https://cdnjs.cloudflare.com/ajax/libs/babel-core/5.8.23/browser.min.js"></script>
<!-- This is used for our ajax calls, there is a better way to do this, but for now most of us understand jquery, so lets start here. -->
<script src="https://cdnjs.cloudflare.com/ajax/libs/jquery/2.2.0/jquery.min.js"></script>
</head>
<body>
<div id="content"></div>
<!-- Write your comments here -->
<script type="text/babel" src="scripts/unfuddleactivity.js"></script>
</body>
</html> |
This gives us a working React.js ecosystem and we will now focus our attention on the unfuddleactivity.js file.
When we crack open this file, you will notice it is pretty big (424 lines), bear with me for now on this, we will fix this in a future article. Each component listed in figure 1 is in this file along with the code to make this component work. I am going to walk you through select parts of this file where I felt I had to learn something to implement the code. For the vanilla React.js stuff, you should have learned this in the tutorial and will be skipped. Feel free to review all the code and send me questions.
Let’s start by looking at the end of the file first. Here we will find our ItemBox component and it is responsible for rendering all the other components which are contained inside of it.
1 2 3 4 | ReactDOM.render( , document.getElementById('content') ); |
Notice when you look at this, it doesn’t look like normal JavaScript. This is because we are using JSX. JSX is a preprocessor step that adds XML syntax to JavaScript. You can definitely use React without JSX, but JSX makes React a lot more elegant. Just like XML, JSX tags have a tag name, attributes, and children.
This code is pretty simple, it is just setting the property “url” for the ItemBox component and rendering the results of the ItemBox into the content div.
Next, let’s look at our ItemBox component definition. The ItemBox contains the main function logic for retrieving the data from the Unfuddle API. First, lets look at the “loadItemsFromServer” function. This function is actually called from the ItemForm component. It is defined on the ItemBox and passed to the ItemForm as props. This is a way we can pass JavaScript functions around to components. This is the use of the ItemForm with the props “onFetchSubmit” set from the parent as the function.
1 | <ItemForm onFetchSubmit={this.loadItemsFromServer} /> |
The logic we want in this function is as follows:
- make a call to the server to get all the items with the fetch criteria
- loop through the results and get all the unique people IDS.
- for each person ID, make a call to Unfuddle and get their name, save this name in an object hash.
- set the state with the results and render the ItemList
JavaScript is really cool in that it likes to do lots of things asynchronously. This helps keep the code from blocking, but introduces some problems. In the logic above, I need to finish step 1, before I can do step 2. Also, I need to finish all the step 3 calls before I can do step 4. Luckily for us, we can use Promises to make this order work. Promises are used to coordinate things in your JavaScript when making asynchronous calls. So, the code for step 1 is here.
1 2 3 4 5 6 7 | var jsPromise = Promise.resolve( $Ajax({ url: fullUrl, headers: {"Authorization": "Basic " + encoded_auth}, dataType: 'json', cache: false })); |
We are using a promise to resolve the .ajax call. This will allow us to put step 2-4 inside that promise “then” block.
1 2 3 4 5 6 7 8 9 10 11 12 13 14 15 16 17 18 19 20 21 22 23 24 25 26 27 28 29 30 31 32 33 34 35 36 37 38 39 40 | jsPromise.then(function(data) { fetchedItems = data; var uniquePersonIds = {} for (var z=0;z<fetchedItems.length;z++) { if (fetchedItems[z].person_id != null) uniquePersonIds[fetchedItems[z].person_id] = ""; } var arrayOfPromises = []; // get the unique list of people id's and then go get their names from unfuddle var uniquePersonIdKeys = Object.keys(uniquePersonIds); for (var x=0;x<uniquePersonIdKeys.length;x++) { var peopleUrl = urlBase + "people/" + uniquePersonIdKeys[x]; var peoplePromise = Promise.resolve( $.ajax({ url: peopleUrl, headers: {"Authorization": "Basic " + encoded_auth}, dataType: 'json', cache: false, })); arrayOfPromises.push(peoplePromise); } // wait for all people to be loaded before setting state so names look good Promise.all(arrayOfPromises).then(function(arrayOfResults) { for(var y=0;y<arrayOfResults.length;y++) { var data = arrayOfResults[y]; people[data.id] = data.first_name + " " + data.last_name; } self.setState({data: fetchedItems, allItems: fetchedItems, people: people}); }); }, function(xhrObj) { console.error(self.props.url, xhrObj.toString()); }); } |
Since we are making a bunch of AJAX calls in step 3, a single promise is not good enough, so we need to use an array of promises. This allows us to create each call with a promise and then store them in an array. Then, we can use the Promise.all function which takes an arrayOfPromises to wait for all of them to complete before we finish with step 4 and set the state.
In this same function, I had the need for a Set and for a Hashtable. I had never used either of these data structures in JavaScript, so I had to figure out how to do this. It turns out that you can use a JavaScript Object for both purposes.
To get a unique set of person IDS, just put them into an object hash, which allows you to have a Hashtable, and then get the keys out. Getting the keys out seems very weird to me compared to other OO languages, but it works fine.
1 2 3 | var uniquePersonIds = {} uniquePersonIds[fetchedItems[z].person_id] = ""; var uniquePersonIdKeys = Object.keys(uniquePersonIds); |
The next bit of code we should look at is the FilterForm and its “Render” function:
1 2 3 4 5 6 7 8 9 10 11 12 13 14 15 16 17 18 19 20 21 22 23 24 25 26 27 28 29 30 31 32 33 34 35 36 37 38 39 40 41 42 43 44 45 46 47 48 49 50 51 52 53 | render: function() { self=this; return ( <form className="filterForm" onSubmit={this.handleSubmit}> <table className="formTable"> <thead> <tr> <th>Action Type</th> <th>User Selected</th> <th>Only Resolved or Closed?</th> </tr> </thead> <tbody> <tr> <td> <select id='actionType' onChange={this.handleChange} > <option value="ALL">ALL</option> <option value="status_update">Status Update</option> <option value="create">Create</option> <option value="reassign">Reassign</option> </select> </td> <td> <select id='userSelected' onChange={this.handleChange} > <option value="0">All</option> { Object.keys(this.props.people).map(function(val,index) { return <option key={val} value={val} > {self.props.people[val]} </option>; }) } </select> </td> <td> <input id='showResolved' type="checkbox" value={this.state.showResolved} onChange={this.handleChange} /> </td> <td> <input type="submit" value="Filter" /> </td> </tr> </tbody> </table> </form> ); } |
There are a few things I had to learn when doing this form. The first is doing tables inside of React. Tables work just like HTML tables, but React will force you to define them correctly (with thead and tbody). The other thing to notice is to give any React element a style we use “className” instead of “class”.
1 | <table className="formTable"> |
In this form, I have 2 types of drop downs, 1 is a static drop down and the other is dynamic. The static drop down works exactly like an HTML select:
16 17 18 19 20 21 | <select id='actionType' onChange={this.handleChange} > <option value="ALL">ALL</option> <option value="status_update">Status Update</option> <option value="create">Create</option> <option value="reassign">Reassign</option> </select> |
The dynamic select looks like:
25 26 27 28 29 30 31 32 33 | <select id='userSelected' onChange={this.handleChange} > <option value="0">All</option> { Object.keys(this.props.people).map(function(val,index) { return <option key={val} value={val} > {self.props.people[val]} </option>; }) } </select> |
Notice the ability to put logic inside the {} brackets to include JavaScript expressions and have them return option/key/value pairs.
For my FilterForm, I needed to figure out how to do a checkbox in Reactjs, this turned out to be very easy:
37 | <input id="showResolved" type="checkbox" value="{this.state.showResolved}" /> |
However, change handlers with checkboxes need to work a little differently. Taking a step back if you look at the Reactjs tutorial, they use a handler per field:
1 2 3 | handleAuthorChange: function(e) { this.setState({author: e.target.value}); }, |
…….
1 | <input type="text" value="{this.state.author}" placeholder="Your name" /> |
To me this seems cumbersome, so I created a generic change handler for our fields:
1 2 3 4 5 6 7 8 9 10 11 12 13 14 | handleChange : function (e) { // this is a generic handle change function that uses the HTML ID to set the state instead of // having a bunch of if statements var stateObject = function() { var returnObj = {}; returnObj[this.target.id] = this.target.value; return returnObj; }.bind(e)(); this.setState(stateObject); }, .................................................................... <input id="subDomain" type="text" value="{this.state.subDomain}" /> |
This allows us to just write one handleChange function and use the convention of the element ID to set the value. However, with checkboxes, they work slightly differently, so we had to create a separate handler for it:
1 2 3 4 5 6 7 8 9 10 11 12 | handleCheckChange : function(e) { // this is a generic handle change function that uses the HTML ID to set the state instead of // having a bunch of if statements for checkboxes var stateObject = function() { var returnObj = {}; var retVal = this.target.checked; returnObj[this.target.id] = retVal; return returnObj; }.bind(e)(); this.setState(stateObject); }, |
Now we have our “FilterForm” all set and ready to go, I want to talk about some challenges I faced when doing the “ItemForm”.
The first challenge was the date fields. Having a nice jQuery date picker with calendar is something that is super easy to do in most apps. Because this is React.js, we can’t just use off the shelf JavaScript components, as they need to be “React” enabled in order to use. Fortunately for us, there are lots of these out there, this link contains a bunch of them. Since I am not using NPM, I couldn’t find a simple way to include them in my app, so for now we are just using text fields. In a future article, we will add these in.
The second challenge was getting today and figuring out 2 weeks ago and making them a formatted string. In Ruby, this would be really simple:
1 2 | endDate = Date.today.strftime('%Y/%m/%d') startDate = 2.week.ago.strftime('%Y/%m/%d') |
In JavaScript, this is the best I could come up with:
1 2 3 4 5 6 7 8 9 10 | var today = new Date(); var dd = today.getDate(); var mm = today.getMonth()+1; //January is 0! var yyyy = today.getFullYear(); var endDate = yyyy + "/" + mm + "/" + dd today.setDate(today.getDate()-14); var dd = today.getDate(); var mm = today.getMonth()+1; //January is 0! var yyyy = today.getFullYear(); var startDate = yyyy + "/" + mm + "/" + dd |
Fortunately, I found out that moment.js has all the same great methods as Ruby & Rails for date/time and formatting. To keep my app simple, I am not adding moment to it yet.
Hopefully, walking through my app and giving some of my lessons was helpful for you. In the next part of this article, we will take this same app and
- add Node Package Manager (NPM)
- incorporate es6 syntax
- investigate a Flux implementation (for the Model & Controller)
- refactor to use a javascript date library
